First thing is first: DON’T CHEAP OUT ON THIS SENSOR
If you get a cheap clone, then it’s probably a BMP280 masquerading as a BME280. Personally, I would recommend the BME280 sensor produced by pimoroni as it will accept 5v without the need for logic converters. Yes, it is more expensive, but it’s better to pay more money for something that works than less money for something that doesn’t.
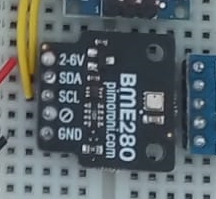
Pinout
If you use the pimoroni sensor then the pins will all be labelled. For a standard arduino uno or nano then the SDA will connect to pin A4 and the SCL will connect to pin A5.
Code
You’ll need to install two libraries; the first being the Adafruit Unified Sensor library, the second being the Adafruit BM280 library.
Once they’re good then the code is as simple as:
#include <Adafruit_Sensor.h>
#include <Adafruit_BME280.h>

#define SEALEVELPRESSURE_HPA (1013.25)  //adjust to suit your location

Adafruit_BME280 bme;

void setup() {

  Serial.begin(9600);
  unsigned status;
  status = bme.begin();

}

void loop() {

  float temperature = bme.readTemperature();
  float humidity = bme.readHumidity();
  float pressure = (bme.readPressure() / 100.0);

  Serial.print(temperature); Serial.println("oC");
  Serial.print(humidity); Serial.println("%");
  Serial.print(pressure); Serial.println("hPa");

  delay(1000);

}
The above code returns a temperature, humidity and barometric pressure reading to the serial monitor every second.
Note that the pressure readings are given in Pascals, so you have to divide by 100 to give hPa.
Last updated: 14/10/2022