*8-Segment, if you include the decimal point.
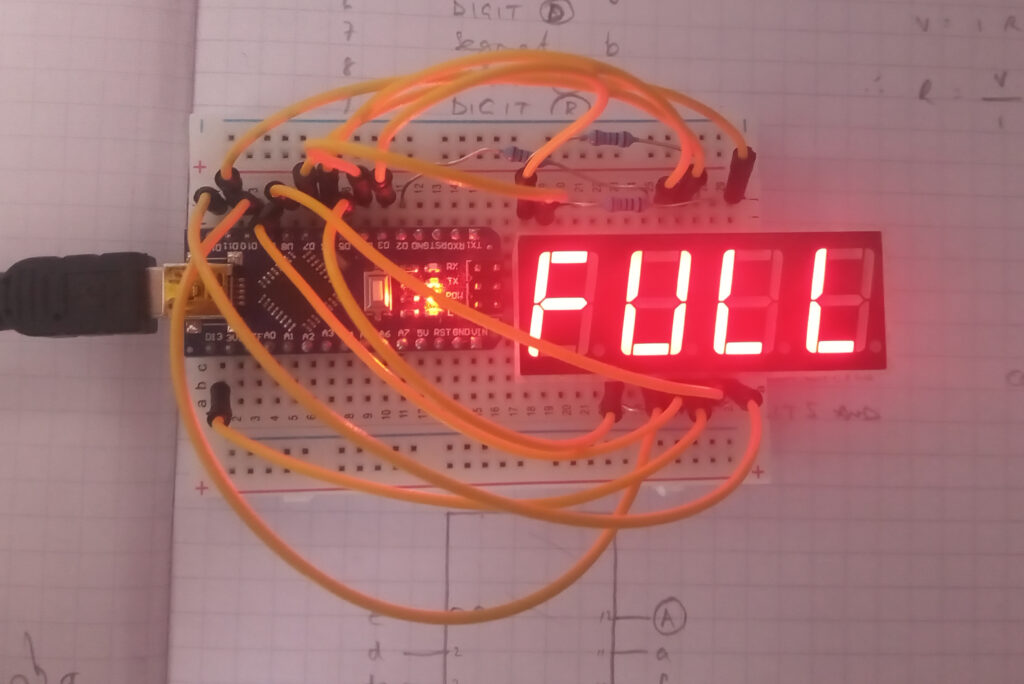
Needed to use this display in a project where I needed to show the sign “FULL”, so this was just a bit of a fuck-about-and-find-out using an Arduino and the manufacture’s datasheet as guide to see how the module worked.
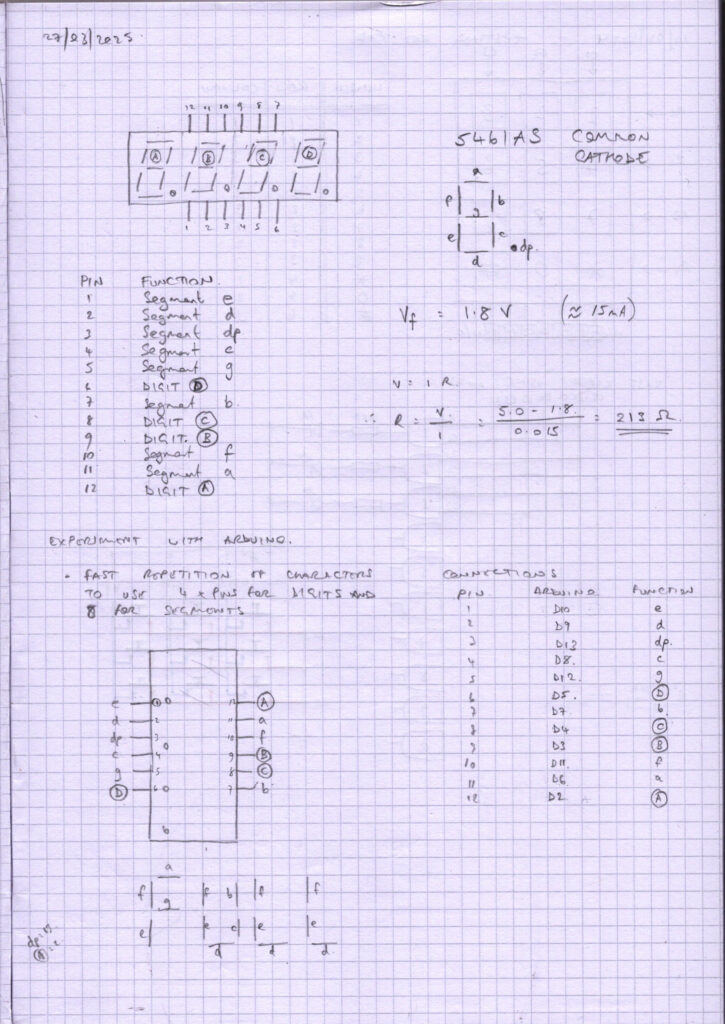
Pinout
This is the common cathode version. The data sheet gives a max current of 30mA per ‘dice’, so I’ve allowed 15mA using a 220ohm resistor connecting to the cathode of each segment.
Code
The concept is simple; the segment pins go high to select that particular selection of segments. Then the required digit pin goes low to display the character. This is a sketch to display “FULL” (as seen in the photo above).
const int A = 2;
const int B = 3;
const int C = 4;
const int D = 5;
const int a = 6;
const int b = 7;
const int c = 8;
const int d = 9;
const int e = 10;
const int f = 11;
const int g = 12;
const int dp = 13;

void setup() {

  for (int i = 2; i < 6; i++) {
    pinMode(i, OUTPUT);
    digitalWrite(i, HIGH);
  }

  for (int i = 6; i < 14; i++) {
    pinMode(i, OUTPUT);
    digitalWrite(i, LOW);
  }

}
Declarations and setup()
The individual segment and digit pins are declared. This simple display uses 12 GPIO pins on the Arduino.
The setup() function uses a couple of for() loops to set the pins as outputs and priming them in their deactivated state.
void loop() {

  //F
  digitalWrite(A, LOW);
  digitalWrite(a, HIGH);
  digitalWrite(g, HIGH);
  digitalWrite(f, HIGH);
  digitalWrite(e, HIGH);
  delay(1);
  digitalWrite(A, HIGH);
  digitalWrite(a, LOW);
  digitalWrite(g, LOW);
  digitalWrite(f, LOW);
  digitalWrite(e, LOW);

  //U
  digitalWrite(B, LOW);
  digitalWrite(b, HIGH);
  digitalWrite(c, HIGH);
  digitalWrite(d, HIGH);
  digitalWrite(e, HIGH);
  digitalWrite(f, HIGH);
  delay(1);
  digitalWrite(B, HIGH);
  digitalWrite(b, LOW);
  digitalWrite(c, LOW);
  digitalWrite(d, LOW);
  digitalWrite(e, LOW);
  digitalWrite(f, LOW);

  //L
  digitalWrite(C, LOW);
  digitalWrite(d, HIGH);
  digitalWrite(f, HIGH);
  digitalWrite(e, HIGH);
  delay(1);
  digitalWrite(C, HIGH);
  digitalWrite(d, LOW);
  digitalWrite(f, LOW);
  digitalWrite(e, LOW);

  //L
  digitalWrite(D, LOW);
  digitalWrite(d, HIGH);
  digitalWrite(f, HIGH);
  digitalWrite(e, HIGH);
  delay(1);
  digitalWrite(D, HIGH);
  digitalWrite(d, LOW);
  digitalWrite(f, LOW);
  digitalWrite(e, LOW);

}
The loop()
This is a bit brute-force. There are no elegant structures of complex arrays. Just lines of code.
The principal is to flash the relevant character across each digit at a speed where the human eye cannot distinguish between the on-off states.
The segment pins are driven HIGH, and the digit pins are driven LOW.
It is important to remember to reset the segment pins after each character has been displayed.
Page created: 01/05/2025